部署客户端渲染应用
Deploying a Client-Side-Rendered App
如果你一直在构建一个仅使用客户端渲染的应用,并使用 Trunk 作为开发服务器和构建工具,那么这个过程非常简单。
If you’ve been building an app that only uses client-side rendering, working with Trunk as a dev server and build tool, the process is quite easy.
trunk build --release
trunk build 将在 dist/ 目录中生成若干构建产物。将 dist 目录发布到网上的某个地方就是你部署应用所需的全部操作。这与部署任何 JavaScript 应用程序非常相似。
trunk build will create a number of build artifacts in a dist/ directory. Publishing dist somewhere online should be all you need to deploy your app. This should work very similarly to deploying any JavaScript application.
我们创建了几个示例仓库,展示了如何将 Leptos CSR 应用设置并部署到各种托管服务。
We've created several example repositories which show how to set up and deploy a Leptos CSR app to various hosting services.
注:Leptos 不背书任何特定的托管服务——请随意使用任何支持静态网站部署的服务。
Note: Leptos does not endorse the use of any particular hosting service - feel free to use any service that supports static site deploys.
示例:
Examples:
Github Pages
Github Pages
将 Leptos CSR 应用部署到 Github Pages 是件简单的事情。首先,进入你的 Github 仓库设置,点击左侧菜单中的 "Pages"。在页面的 "Build and deployment" 部分,将 "source" 更改为 "Github Actions"。然后将以下内容复制到类似 .github/workflows/gh-pages-deploy.yml 的文件中。
Deploying a Leptos CSR app to Github pages is a simple affair. First, go to your Github repo's settings and click on "Pages" in the left side menu. In the "Build and deployment" section of the page, change the "source" to "Github Actions". Then copy the following into a file such as .github/workflows/gh-pages-deploy.yml
示例
示例
name: Release to Github Pages

on:
  push:
    branches: [main]
  workflow_dispatch:

permissions:
  contents: write # 用于提交到 gh-pages 分支。
  # for committing to gh-pages branch.
  pages: write
  id-token: write

# 仅允许一个并发部署,跳过在进行中的运行与最新排队的运行之间排队的运行。
# 但是,不要取消进行中的运行,因为我们希望允许这些生产部署完成。
# Allow only one concurrent deployment, skipping runs queued between the run in-progress and latest queued.
# However, do NOT cancel in-progress runs as we want to allow these production deployments to complete.
concurrency:
  group: "pages"
  cancel-in-progress: false

jobs:
  Github-Pages-Release:

    timeout-minutes: 10

    environment:
      name: github-pages
      url: ${{ steps.deployment.outputs.page_url }}

    runs-on: ubuntu-latest

    steps:
      - uses: actions/checkout@v4 # 检出仓库 (repo checkout)

      # 安装 Rust Nightly 工具链,包含 Clippy 和 Rustfmt
      # Install Rust Nightly Toolchain, with Clippy & Rustfmt
      - name: Install nightly Rust
        uses: dtolnay/rust-toolchain@nightly
        with:
          components: clippy, rustfmt

      - name: Add WASM target
        run: rustup target add wasm32-unknown-unknown

      - name: lint
        run: cargo clippy & cargo fmt


      # 如果使用 tailwind...
      # If using tailwind...
      # - name: Download and install tailwindcss binary
      #   run: npm install -D tailwindcss && npx tailwindcss -i <INPUT/PATH.css> -o <OUTPUT/PATH.css>  # 运行 tailwind (run tailwind)


      - name: Download and install Trunk binary
        run: wget -qO- https://github.com/trunk-rs/trunk/releases/download/v0.18.4/trunk-x86_64-unknown-linux-gnu.tar.gz | tar -xzf-

      - name: Build with Trunk
        # "${GITHUB_REPOSITORY#*/}" 计算为仓库名称
        # 使用 --public-url 某值将允许 trunk 修改所有 href 路径,例如将 favicon.ico 改为 repo_name/favicon.ico。
        # 这对于 github pages 是必要的,因为站点部署在 username.github.io/repo_name,所有文件必须以
        # 相对路径请求。如果我们跳过 public-url 选项,href 路径将转而请求 username.github.io/favicon.ico,
        # 这显然会返回 404 错误。
        # "${GITHUB_REPOSITORY#*/}" evaluates into the name of the repository
        # using --public-url something will allow trunk to modify all the href paths like from favicon.ico to repo_name/favicon.ico .
        # this is necessary for github pages where the site is deployed to username.github.io/repo_name and all files must be requested
        # relatively as favicon.ico. if we skip public-url option, the href paths will instead request username.github.io/favicon.ico which
        # will obviously return error 404 not found.
        run: ./trunk build --release --public-url "${GITHUB_REPOSITORY#*/}"

      # 将 index.html 复制到 404.html 以支持 SPA 路由
      # 如果客户端从任何路由进入,将允许路由工作
      # Copy index.html to 404.html for SPA routing
      # Will allow routing to work if client enters from any route
      # - name: Copy index.html to 404.html
      #   run: cp dist/index.html dist/404.html

      # 部署到 gh-pages 分支
      # Deploy to gh-pages branch
      # - name: Deploy 🚀
      #   uses: JamesIves/github-pages-deploy-action@v4
      #   with:
      #     folder: dist


      # 使用 Github Static Pages 部署
      # Deploy with Github Static Pages

      - name: Setup Pages
        uses: actions/configure-pages@v5
        with:
          enablement: true
          # token:

      - name: Upload artifact
        uses: actions/upload-pages-artifact@v3
        with:
          # 上传 dist 目录
          # Upload dist dir
          path: './dist'

      - name: Deploy to GitHub Pages 🚀
        id: deployment
        uses: actions/deploy-pages@v4
关于部署到 Github Pages 的更多信息,请参阅此处的示例仓库
For more on deploying to Github Pages see the example repo here
Vercel
Vercel
第一步:设置 Vercel
Step 1: Set Up Vercel
在 Vercel 网页界面中...
In the Vercel Web UI...
-
创建一个新项目
-
Create a new project
-
确保
-
Ensure
-
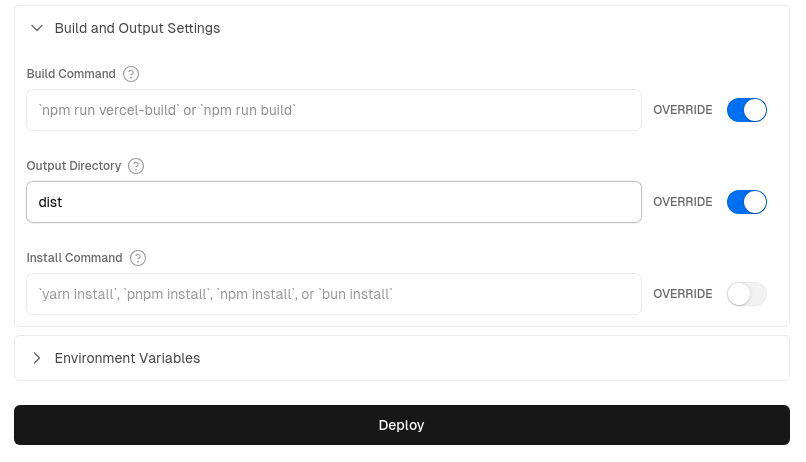
"Build Command" 保持为空且 Override 开启
-
The "Build Command" is left empty with Override on
-
"Output Directory" 更改为
dist(这是 Trunk 构建的默认输出目录)且 Override 开启 -
The "Output Directory" is changed to dist (which is the default output directory for Trunk builds) and the Override is on
-
第二步:为 GitHub Actions 添加 Vercel 凭据
Step 2: Add Vercel Credentials for GitHub Actions
注意:预览和部署操作都需要在 GitHub secrets 中设置你的 Vercel 凭据。
Note: Both the preview and deploy actions will need your Vercel credentials setup in GitHub secrets
-
通过进入 "Account Settings" > "Tokens" 并创建一个新令牌来获取你的 Vercel 访问令牌 (Access Token)——保存该令牌以在下面的第 5 小步中使用。
-
Retrieve your Vercel Access Token by going to "Account Settings" > "Tokens" and creating a new token - save the token to use in sub-step 5, below.
-
使用
npm i -g vercel命令安装 Vercel CLI,然后运行vercel login登录你的账户。 -
Install the Vercel CLI using the
npm i -g vercelcommand, then runvercel loginto login to your acccount. -
在你的文件夹内,运行
vercel link来创建一个新的 Vercel 项目;在 CLI 中,你会被问到 'Link to an existing project?'——回答 yes,然后输入你在第一步中创建的名称。系统会为你创建一个新的.vercel文件夹。 -
Inside your folder, run
vercel linkto create a new Vercel project; in the CLI, you will be asked to 'Link to an existing project?' - answer yes, then enter the name you created in step 1. A new.vercelfolder will be created for you. -
在生成的
.vercel文件夹中,打开project.json文件并保存 "projectId" 和 "orgId" 以用于下一步。 -
Inside the generated
.vercelfolder, open the theproject.jsonfile and save the "projectId" and "orgId" for the next step. -
在 GitHub 中,进入仓库的 "Settings" > "Secrets and Variables" > "Actions",并添加以下内容作为 Repository secrets:
-
Inside GitHub, go the repo's "Settings" > "Secrets and Variables" > "Actions" and add the following as Repository secrets:
-
将你的 Vercel 访问令牌(来自第 1 小步)保存为
VERCEL_TOKENsecret -
save your Vercel Access Token (from sub-step 1) as the
VERCEL_TOKENsecret -
从
.vercel/project.json中将 "projectID" 添加为VERCEL_PROJECT_ID -
from the
.vercel/project.jsonadd "projectID" asVERCEL_PROJECT_ID -
从
.vercel/project.json中将 "orgId" 添加为VERCEL_ORG_ID -
from the
.vercel/project.jsonadd "orgId" asVERCEL_ORG_ID
-
有关完整说明,请参阅 "如何在 Vercel 中使用 Github Actions"
For full instructions see "How can I use Github Actions with Vercel"
第三步:添加 Github Action 脚本
Step 3: Add Github Action Scripts
最后,你只需从下方或示例仓库的 .github/workflows/ 文件夹中复制并粘贴这两个文件——一个用于部署,一个用于 PR 预览——到你自己的 github workflows 文件夹中。这样,在你下次 commit 或 PR 时,部署将自动发生。
Finally, you're ready to simply copy and paste the two files - one for deployment, one for PR previews - from below or from the example repo's .github/workflows/ folder into your own github workflows folder - then, on your next commit or PR deploys will occur automatically.
生产环境部署脚本:vercel_deploy.yml
Production deployment script: vercel_deploy.yml
示例
示例
name: Release to Vercel

on:
push:
	branches:
	- main
env:
CARGO_TERM_COLOR: always
VERCEL_ORG_ID: ${{ secrets.VERCEL_ORG_ID }}
VERCEL_PROJECT_ID: ${{ secrets.VERCEL_PROJECT_ID }}

jobs:
Vercel-Production-Deployment:
	runs-on: ubuntu-latest
	environment: production
	steps:
	- name: git-checkout
		uses: actions/checkout@v3

	- uses: dtolnay/rust-toolchain@nightly
		with:
		components: clippy, rustfmt
	- uses: Swatinem/rust-cache@v2
	- name: Setup Rust
		run: |
		rustup target add wasm32-unknown-unknown
		cargo clippy
		cargo fmt --check

	- name: Download and install Trunk binary
		run: wget -qO- https://github.com/trunk-rs/trunk/releases/download/v0.18.2/trunk-x86_64-unknown-linux-gnu.tar.gz | tar -xzf-


	- name: Build with Trunk
		run: ./trunk build --release

	- name: Install Vercel CLI
		run: npm install --global vercel@latest

	- name: Pull Vercel Environment Information
		run: vercel pull --yes --environment=production --token=${{ secrets.VERCEL_TOKEN }}

	- name: Deploy to Vercel & Display URL
		id: deployment
		working-directory: ./dist
		run: |
		vercel deploy --prod --token=${{ secrets.VERCEL_TOKEN }} >> $GITHUB_STEP_SUMMARY
		echo $GITHUB_STEP_SUMMARY
预览部署脚本:vercel_preview.yml
Preview deployments script: vercel_preview.yml
示例
示例
# 有关 vercel action 的更多信息请参阅:
# For more info re: vercel action see:
# https://github.com/amondnet/vercel-action

name: Leptos CSR Vercel Preview

on:
pull_request:
	branches: [ "main" ]

workflow_dispatch:

env:
CARGO_TERM_COLOR: always
VERCEL_ORG_ID: ${{ secrets.VERCEL_ORG_ID }}
VERCEL_PROJECT_ID: ${{ secrets.VERCEL_PROJECT_ID }}

jobs:
fmt:
	name: Rustfmt
	runs-on: ubuntu-latest
	steps:
	- uses: actions/checkout@v4
	- uses: dtolnay/rust-toolchain@nightly
		with:
		components: rustfmt
	- name: Enforce formatting
		run: cargo fmt --check

clippy:
	name: Clippy
	runs-on: ubuntu-latest
	steps:
	- uses: actions/checkout@v4
	- uses: dtolnay/rust-toolchain@nightly
		with:
		components: clippy
	- uses: Swatinem/rust-cache@v2
	- name: Linting
		run: cargo clippy -- -D warnings

test:
	name: Test
	runs-on: ubuntu-latest
	needs: [fmt, clippy]
	steps:
	- uses: actions/checkout@v4
	- uses: dtolnay/rust-toolchain@nightly
	- uses: Swatinem/rust-cache@v2
	- name: Run tests
		run: cargo test

build-and-preview-deploy:
	runs-on: ubuntu-latest
	name: Build and Preview

	needs: [test, clippy, fmt]

	permissions:
	pull-requests: write

	environment:
	name: preview
	url: ${{ steps.preview.outputs.preview-url }}

	steps:
	- name: git-checkout
		uses: actions/checkout@v4

	- uses: dtolnay/rust-toolchain@nightly
	- uses: Swatinem/rust-cache@v2
	- name: Build
		run: rustup target add wasm32-unknown-unknown

	- name: Download and install Trunk binary
		run: wget -qO- https://github.com/trunk-rs/trunk/releases/download/v0.18.2/trunk-x86_64-unknown-linux-gnu.tar.gz | tar -xzf-


	- name: Build with Trunk
		run: ./trunk build --release

	- name: Preview Deploy
		id: preview
		uses: amondnet/vercel-action@v25.1.1
		with:
		vercel-token: ${{ secrets.VERCEL_TOKEN }}
		github-token: ${{ secrets.GITHUB_TOKEN }}
		vercel-org-id: ${{ secrets.VERCEL_ORG_ID }}
		vercel-project-id: ${{ secrets.VERCEL_PROJECT_ID }}
		github-comment: true
		working-directory: ./dist

	- name: Display Deployed URL
		run: |
		echo "Deployed app URL: ${{ steps.preview.outputs.preview-url }}" >> $GITHUB_STEP_SUMMARY
有关更多信息,请参阅此处的示例仓库。
See the example repo here for more.
Spin - 无服务器 WebAssembly
Spin - Serverless WebAssembly
另一个选择是使用 Spin 之类的无服务器平台。尽管 Spin 是开源的,你可以在自己的基础设施(例如 Kubernetes 内部)上运行它,但在生产环境中开始使用 Spin 的最简单方法是使用 Fermyon Cloud。
Another option is using a serverless platform such as Spin. Although Spin is open source and you can run it on your own infrastructure (eg. inside Kubernetes), the easiest way to get started with Spin in production is to use the Fermyon Cloud.
首先按照此处的说明安装 Spin CLI,如果你还没有为你的 Leptos CSR 项目创建 Github 仓库,请先创建一个。
Start by installing the Spin CLI using the instructions, here, and creating a Github repo for your Leptos CSR project, if you haven't done so already.
-
打开 "Fermyon Cloud" > "User Settings"。如果你未登录,请选择 Login With GitHub 按钮。
-
Open "Fermyon Cloud" > "User Settings". If you’re not logged in, choose the Login With GitHub button.
-
在 “Personal Access Tokens” 中,选择 “Add a Token”。输入名称 “gh_actions” 并点击 “Create Token”。
-
In the “Personal Access Tokens”, choose “Add a Token”。Enter the name “gh_actions” and click “Create Token”.
-
Fermyon Cloud 会显示令牌;点击复制按钮将其复制到剪贴板。
-
Fermyon Cloud displays the token; click the copy button to copy it to your clipboard.
-
进入你的 Github 仓库并打开 "Settings" > "Secrets and Variables" > "Actions",使用变量名 "FERMYON_CLOUD_TOKEN" 将 Fermyon 云令牌添加到 "Repository secrets" 中。
-
Go into your Github repo and open "Settings" > "Secrets and Variables" > "Actions" and add the Fermyon cloud token to "Repository secrets" using the variable name "FERMYON_CLOUD_TOKEN"
-
将以下 Github Actions 脚本复制并粘贴到你的
.github/workflows/<SCRIPT_NAME>.yml文件中。 -
Copy and paste the following Github Actions scripts (below) into your
.github/workflows/<SCRIPT_NAME>.ymlfiles -
启用 'preview' 和 'deploy' 脚本后,Github Actions 现在会在 pull 请求时生成预览,并在 'main' 分支更新时自动部署。
-
With the 'preview' and 'deploy' scripts active, Github Actions will now generate previews on pull requests & deploy automatically on updates to your 'main' branch.
生产环境部署脚本:spin_deploy.yml
Production deployment script: spin_deploy.yml
示例
示例
# 有关 Fermyon Cloud 所需的设置说明,请参阅:
# For setup instructions needed for Fermyon Cloud, see:
# https://developer.fermyon.com/cloud/github-actions

# 参考信息请参阅:
# For reference, see:
# https://developer.fermyon.com/cloud/changelog/gh-actions-spin-deploy

# 有关 Fermyon gh actions 本身,请参阅:
# For the Fermyon gh actions themselves, see:
# https://github.com/fermyon/actions

name: Release to Spin Cloud

on:
push:
	branches: [main]
workflow_dispatch:

permissions:
contents: read
id-token: write

# 仅允许一个并发部署,跳过在进行中的运行与最新排队的运行之间排队的运行。
# 但是,不要取消进行中的运行,因为我们希望允许这些生产部署完成。
# Allow only one concurrent deployment, skipping runs queued between the run in-progress and latest queued.
# However, do NOT cancel in-progress runs as we want to allow these production deployments to complete.
concurrency:
group: "spin"
cancel-in-progress: false

jobs:
Spin-Release:

	timeout-minutes: 10

	environment:
	name: production
	url: ${{ steps.deployment.outputs.app-url }}

	runs-on: ubuntu-latest

	steps:
	- uses: actions/checkout@v4 # 检出仓库 (repo checkout)

	# 安装 Rust Nightly 工具链,包含 Clippy 和 Rustfmt
	# Install Rust Nightly Toolchain, with Clippy & Rustfmt
	- name: Install nightly Rust
		uses: dtolnay/rust-toolchain@nightly
		with:
		components: clippy, rustfmt

	- name: Add WASM & WASI targets
		run: rustup target add wasm32-unknown-unknown && rustup target add wasm32-wasi

	- name: lint
		run: cargo clippy & cargo fmt


	# 如果使用 tailwind...
	# If using tailwind...
	# - name: Download and install tailwindcss binary
	#   run: npm install -D tailwindcss && npx tailwindcss -i <INPUT/PATH.css> -o <OUTPUT/PATH.css>  # 运行 tailwind (run tailwind)


	- name: Download and install Trunk binary
		run: wget -qO- https://github.com/trunk-rs/trunk/releases/download/v0.18.2/trunk-x86_64-unknown-linux-gnu.tar.gz | tar -xzf-


	- name: Build with Trunk
		run: ./trunk build --release


	# 安装 Spin CLI 并部署
	# Install Spin CLI & Deploy

	- name: Setup Spin
		uses: fermyon/actions/spin/setup@v1
		# with:
		# plugins:


	- name: Build and deploy
		id: deployment
		uses: fermyon/actions/spin/deploy@v1
		with:
		fermyon_token: ${{ secrets.FERMYON_CLOUD_TOKEN }}
		# key_values: |-
			# abc=xyz
			# foo=bar
		# variables: |-
			# password=${{ secrets.SECURE_PASSWORD }}
			# apikey=${{ secrets.API_KEY }}

	# 创建一个明确的消息来显示部署应用的 URL,并显示在任务图中
	# Create an explicit message to display the URL of the deployed app, as well as in the job graph
	- name: Deployed URL
		run: |
		echo "Deployed app URL: ${{ steps.deployment.outputs.app-url }}" >> $GITHUB_STEP_SUMMARY
预览部署脚本:spin_preview.yml
Preview deployment script: spin_preview.yml
示例
示例
# 有关 Fermyon Cloud 所需的设置说明,请参阅:
# For setup instructions needed for Fermyon Cloud, see:
# https://developer.fermyon.com/cloud/github-actions


# 有关 Fermyon gh actions 本身,请参阅:
# For the Fermyon gh actions themselves, see:
# https://github.com/fermyon/actions

# 具体参阅:
# Specifically:
# https://github.com/fermyon/actions?tab=readme-ov-file#deploy-preview-of-spin-app-to-fermyon-cloud---fermyonactionsspinpreviewv1

name: Preview on Spin Cloud

on:
pull_request:
	branches: ["main", "v*"]
	types: ['opened', 'synchronize', 'reopened', 'closed']
workflow_dispatch:

permissions:
contents: read
pull-requests: write

# 仅允许一个并发部署,跳过在进行中的运行与最新排队的运行之间排队的运行。
# 但是,不要取消进行中的运行,因为我们希望允许这些生产部署完成。
# Allow only one concurrent deployment, skipping runs queued between the run in-progress and latest queued.
# However, do NOT cancel in-progress runs as we want to allow these production deployments to complete.
concurrency:
group: "spin"
cancel-in-progress: false

jobs:
Spin-Preview:

	timeout-minutes: 10

	environment:
	name: preview
	url: ${{ steps.preview.outputs.app-url }}

	runs-on: ubuntu-latest

	steps:
	- uses: actions/checkout@v4 # 检出仓库 (repo checkout)

	# 安装 Rust Nightly 工具链,包含 Clippy 和 Rustfmt
	# Install Rust Nightly Toolchain, with Clippy & Rustfmt
	- name: Install nightly Rust
		uses: dtolnay/rust-toolchain@nightly
		with:
		components: clippy, rustfmt

	- name: Add WASM & WASI targets
		run: rustup target add wasm32-unknown-unknown && rustup target add wasm32-wasi

	- name: lint
		run: cargo clippy & cargo fmt


	# 如果使用 tailwind...
	# If using tailwind...
	# - name: Download and install tailwindcss binary
	#   run: npm install -D tailwindcss && npx tailwindcss -i <INPUT/PATH.css> -o <OUTPUT/PATH.css>  # 运行 tailwind (run tailwind)


	- name: Download and install Trunk binary
		run: wget -qO- https://github.com/trunk-rs/trunk/releases/download/v0.18.2/trunk-x86_64-unknown-linux-gnu.tar.gz | tar -xzf-


	- name: Build with Trunk
		run: ./trunk build --release


	# 安装 Spin CLI 并部署
	# Install Spin CLI & Deploy

	- name: Setup Spin
		uses: fermyon/actions/spin/setup@v1
		# with:
		# plugins:


	- name: Build and preview
		id: preview
		uses: fermyon/actions/spin/preview@v1
		with:
		fermyon_token: ${{ secrets.FERMYON_CLOUD_TOKEN }}
		github_token: ${{ secrets.GITHUB_TOKEN }}
		undeploy: ${{ github.event.pull_request && github.event.action == 'closed' }}
		# key_values: |-
			# abc=xyz
			# foo=bar
		# variables: |-
			# password=${{ secrets.SECURE_PASSWORD }}
			# apikey=${{ secrets.API_KEY }}


	- name: Display Deployed URL
		run: |
		echo "Deployed app URL: ${{ steps.preview.outputs.app-url }}" >> $GITHUB_STEP_SUMMARY
有关更多信息,请参阅此处的示例仓库。
Netlify
Netlify
将 Leptos CSR 应用部署到 Netlify 所需的一切就是创建一个项目并在项目根目录中添加两个简单的配置文件。让我们从后者开始。
All it takes to deploy a Leptos CSR app to Netlify is to create a project and to add two simple configuration files in your project root. Let's begin with the latter.
配置文件
Configuration Files
在你的项目根目录创建一个 netlify.toml 文件,内容如下:
Create a netlify.toml file in your project root with the following content:
[build]
command = "rustup target add wasm32-unknown-unknown && cargo install trunk --locked && trunk build --release"
publish = "dist"

[build.environment]
RUST_VERSION = "stable"

[[redirects]]
from = "/*"
to = "/index.html"
status = 200
在你的项目根目录创建一个 rust-toolchain.toml 文件,内容如下:
Create a rust-toolchain.toml file in your project root with the following
content:
[toolchain]
channel = "stable"
targets = ["wasm32-unknown-unknown"]
部署
Deployment
-
通过连接你的 Git 仓库将你的项目添加到 Netlify。
-
Add your project to Netlify by connecting your Git repository
-
Netlify 将自动检测你的
netlify.toml配置。 -
Netlify will automatically detect your
netlify.tomlconfiguration -
如果你需要额外的环境变量,请在 Netlify 的环境变量设置中进行配置。
-
If you need additional environment variables, configure them in Netlify's environment variables settings
rust-toolchain.toml 确保在构建过程中正确的 Rust 工具链和 WASM 目标可用。netlify.toml 中的重定向规则确保通过为所有路径提供 index.html 来让你的 SPA 路由正常工作。
The rust-toolchain.toml ensures the correct Rust toolchain and WASM target are
available during the build process. The redirect rule in netlify.toml ensures
your SPA routes work correctly by serving index.html for all paths.